Role Hierarchy:
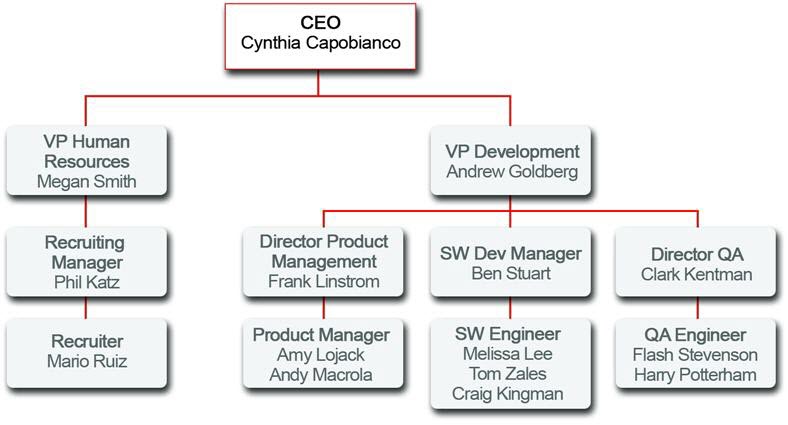
Implementing a role hierarchy in the platform is easy once you have an idea of what the hierarchy should look like. It's best to start with your company's org chart and then consolidate different job titles into single roles wherever possible. For example, if Ben Stuart's software development group has a staff software engineer and a junior software engineer, these positions can be consolidated into a single Software Engineer role in the hierarchy.
Once that's squared away, we can get started defining the role hierarchy itself. For our exercise, we'll use the role hierarchy we talked about previously.
From Setup, enter Roles in the Quick Find box, then select Roles. If you see an introductory splash page called Understanding Roles, click Set Up Roles at the bottom of the page to skip to the actual tool.
Empty Role Hierarchy Page in Tree View Mode:
From Setup, enter Roles in the Quick Find box, then select Roles. If you see an introductory splash page called Understanding Roles, click Set Up Roles at the bottom of the page to skip to the actual tool.
Empty Role Hierarchy Page in Tree View Mode:
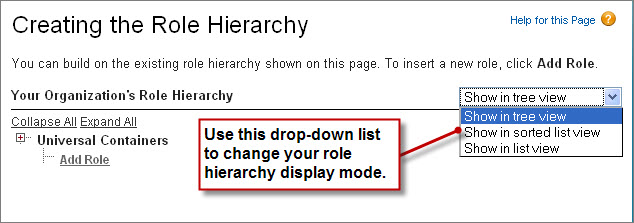
When you first start defining a role hierarchy, the tree view displays a single placeholder node with the name of your organization. From this point, we need to add the name of the role that is highest up in the hierarchy—in our case, the CEO.
Just under the name of your organization—in this case, Universal Containers—click Add Role.
In the Label text box, enter CEO. The Role Name text box auto populates with CEO.In the This role reports to text box, click the lookup icon and click Select next to the name of your organization.
By choosing the name of the organization in the This role reports to text box, we're indicating that the CEO role is a top-level position in our role hierarchy and doesn't report to anyone.
In the Role Name as displayed on reports text box, enter CEO. This text is used in reports to indicate the name of a role. Since you may not want a long role name, like Vice President of Product Development, taking up too much space in your report columns, it's advisable to use a shortened, yet easily identifiable, abbreviation.
Leave any other options, such as Opportunity Access, set to their defaults. These access options don't have anything to do with our Recruiting app, and only appear if you have the org-wide defaults for a standard object set to a level more restrictive than Public Read/Write.
Click Save.
CEO Role Detail Page:
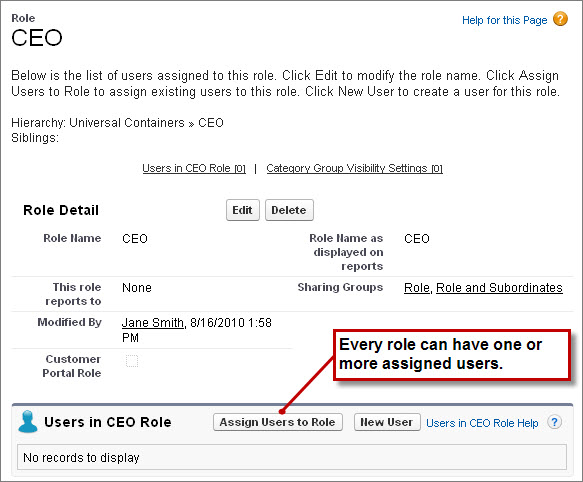
Now that we've created our first role, we can assign the appropriate user to it.
Click CEO to open the CEO role detail page.
In the CEO role detail page, click Assign Users to Role.
In the Available Users drop-down list, select All Unassigned.
Choose a user from the list (in our case, Cynthia Capablanca), and click Add to move her to the Selected Users for CEO list.
Click Save.
If we return to the main Roles page from Setup by entering Roles in the Quick Find box, then selecting Roles, we can now see our new CEO role in the hierarchy.
Define the rest of the roles according to the Universal Containers Role Hierarchy diagram.
Define the rest of the roles according to the Universal Containers Role Hierarchy diagram.
There's no need to assign users to every role at this point—we'll do that later when we create the rest of our users and test out our app.
Universal Containers Role Hierarchy:
Universal Containers Role Hierarchy: