8 Apr 2016

SFDC Functionality- Service Cloud

Gone are the days when support agents just needed phones to help customers. Now, there’s email, websites, online chats, social media—and who knows what’s next? It might seem like finding and deploying all the tools agents need to make customers happy is as difficult as climbing Mount Everest. But it’s not. With the Service Cloud, you can set up entire call centers in a few hours. Plus, with minimal training, agents can use the Service Cloud to quickly answer customers’ questions, whether by phone, text chat—you name it!
The Service Cloud Workbook shows you how your agents can monitor and respond to all of your customer channels from one screen.  Through a series of tutorials, we’ll show you how to click a few buttons to set up an awesome help desk for your service team.  Then, we’ll add your customers’ preferred channels, and integrate those channels with the help desk. When you finish the tutorials, you’ll have customized a user interface that helps your agents decrease clicks and context-switching to decrease customer-response times.  And, you’ll have set up a few features that your customers will love because they’ll be able to contact you by their favorite channel. By the end of the exercises, your help desk, or what we call a Salesforce console, will look something like this:
Screen shot of a Salesforce console

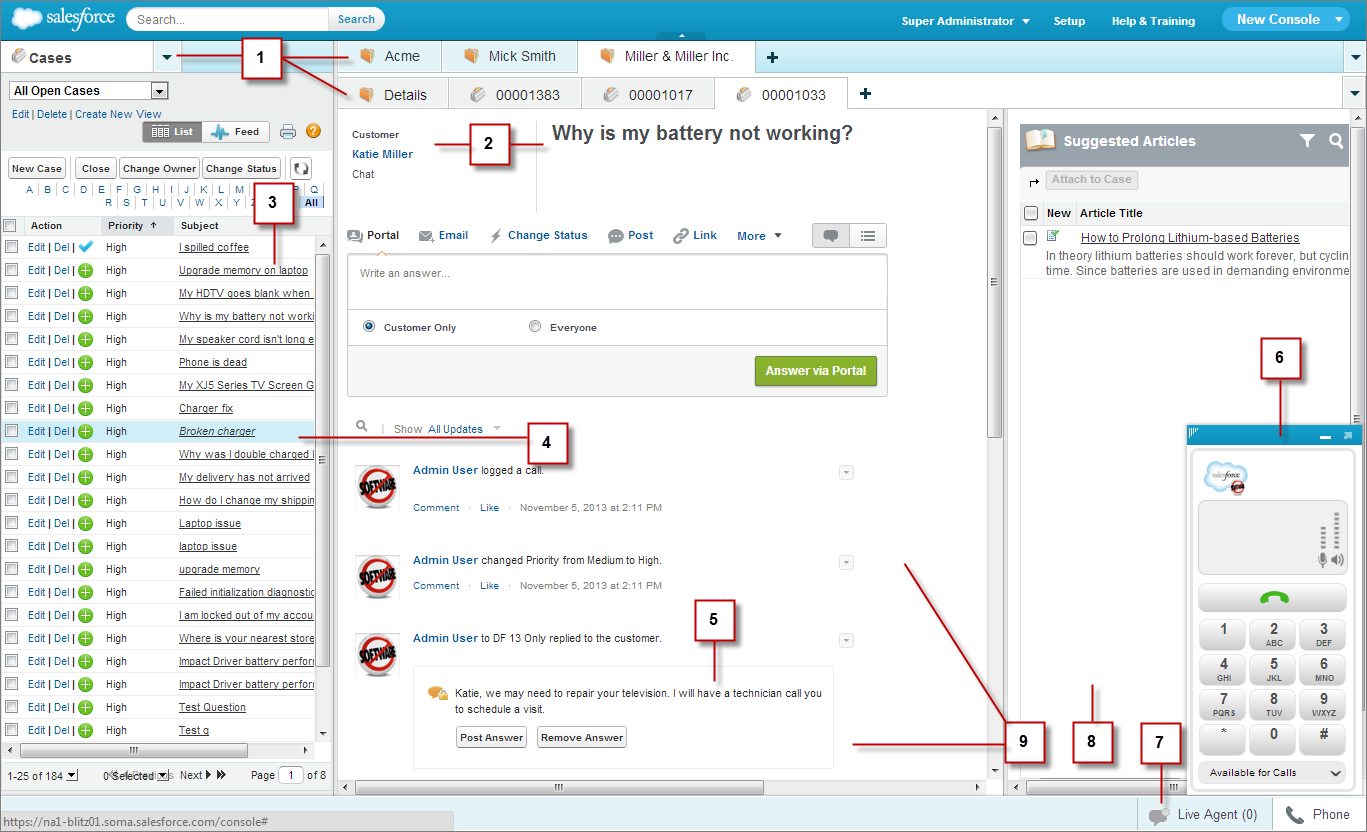
  1. Tabs for easy navigation
  2. Highlights panel to spot important items quickly
  3. Customized lists to display to-do items
  4. Push notifications to see when items are updated by others
  5. Customer inquiries from emails and the Web
  6. Call-control tools to receive and make phone calls
  7. Text-chat to work with customers in real-time
  8. Knowledge sidebar to find or suggest content from a knowledge base
  9. Feed view for a streamlined way to interact with customer issues.
Intended Audience:
This workbook is for administrators who want to give their customers more contact channels, and give agents new ways to receive and respond to customers’ issues.  It assumes administrators are already familiar with basic case management functionality, such as queues, workflow, escalation, and auto-response rules, and instead focuses on setting up a call center that centers around a help desk, otherwise known as a Salesforce console.  This workbook doesn’t cover security features, customizing Salesforce, or managing Salesforce users.  Please see the online help for more information about those topics.
Before You Begin:
This workbook is designed for administrators with Enterprise, Unlimited, or Performance Editions that have purchased the following user and feature licenses:
Licenses Needed
To give users access to a Salesforce console:
Service Cloud User
To give customers access to Salesforce Communities:
Create and Set Up Communities
Customize Application
To give users access to Live Agent:
Live Agent User
To give users access to Salesforce Knowledge:
Knowledge User
Permissions You Need:
 This workbook is designed to be used with any organization that has Service Cloud
 features enabled. You’ll need the following permissions to perform the exercises
 in this workbook:
User Permissions Needed
To set up a Salesforce console:
“Customize Application”
To set up On-Demand Email-to-Case:
“Modify All Data”
AND
“Customize Application”
To set up Salesforce Communities:
“Customize Application”
To set up a Call Center with Open CTI:
“Manage Call Centers”
AND
“Customize Application”
To set up Live Agent:
“Customize Application”
AND
“Manage Users”
To set up Salesforce Knowledge:
“Customize Application”
AND
“Manage Salesforce Knowledge
AND
“Manage Data Categories”
AND
“Manage Users”
To set up Case Feed:
“Customize Application”
AND
“Manage Users”

2 Apr 2016

SFDC Functionality- Opportunity Management

The opportunity object contains the information for every deal you’re tracking, such as deal size and expected close date. The opportunity object is at the core of your sales process. By managing it correctly, you’ll get the most value from your investment in Sales force CRM. To gain visibility into your pipeline, you need to make sure that your reps diligently track their deals and update the opportunity fields with accurate information. This process makes everyone’s life easier. Sales managers will be able to see how the sales organization is performing in real time, and the sales reps won’t have to spend hours putting together reports and sales projections. Updating the opportunity object is so important that many organizations insist that, “If it isn’t in Sales force, it doesn’t exist.” 

Opportunity Line Item: These are the Products which are associated to an Opportunity.
A company can have a number of products which it sells. All these products are generalized as Products. However, when a Product, or a number of Products are attached to an Opportunity, then they are called "Opportunity Line Item" records.
The $ value attached to an Opportunity comes from the Products associated with that particular opportunity as each Product (or Opportunity Line Item) has a $ value associated to it.

Set Standards for Salesforce.com Opportunity Creation:

The key is – how should your business define an Opportunity, and when should we convert a Lead into one? Well, this will differ for every business, and will depend largely on your sales cycle, as well s your customer’s buying cycles.
One of the recommendations we give to our clients is to have a fairly rigorous standard for Opportunity conversion. While we want to move Leads out of the Lead category fairly soon, we don’t have to create an Opportunity. They can simply become Accounts and Contacts, with the potential to create an Opportunity at a later date. At a minimum, an Opportunity needs to have the following (our rules – not Salesforce.com’s): A projected Close date; a projected amount of revenue; Competitors being considered for the project; the final decision maker; the business challenge being solved.
Our advice to companies that we work with, is that your sales person should only create an Opportunity once they can provide some key detail around these 5 areas. If they can’t then they really should be going back and qualifying some more.

Sales force: Opportunity Record:

An opportunity record in Sales force is the collection of fields that make up the information on a deal you’re tracking. The record has only two modes: In Edit mode, you modify fields; in View mode, you view the fields and the opportunity’s related lists.
An opportunity record comes preconfigured with several standard fields. Most of these fields are self-explanatory, but be sure to pay attention to these critical ones:
  • Amount: This field displays the intended, best-guess amount of the sale. Depending on the way your company calculates the pipeline report, you might use numbers that include total contract value, the bookings amount, and so on.
  • Close Date: Use this required field for your best guess as to when you’ll close this deal. Depending on your company’s sales process, the close date has different definitions, but this field is commonly used to track the date that you signed all the paperwork required to book the sale.
  • Expected Revenue: This read-only field is automatically generated by multiplying the Amount field by the Probability field.
  • Forecast Category: This field is typically hidden, but every opportunity automatically includes a value. Each sales stage within the Stage drop-down list corresponds to a default forecast category so that higher-probability opportunities contribute to your overall forecast after they reach certain stages.
  • Opportunity Owner: This person in your organization owns the opportunity. Although an opportunity record has only one owner, many users can still collaborate on an opportunity.
  • Opportunity Name: This required text field represents the name of the specific deal as you want it to appear on your list of opportunities or on a pipeline report.
  • Private: If you want to keep an opportunity private, select this check box to render the record accessible to only you, your bosses, and the system administrator. This field isn’t available in Team Edition.
  • Probability: The probability is the confidence factor associated with the likelihood that you’ll win the opportunity. Each sales stage that your company defines is associated with a default probability to close. Typically, you don’t need to edit this field; it gets assigned automatically by the Stage option that you pick. In fact, your administrator might remove write access from this field altogether.
  • Stage: This required field allows you to track your opportunities, following your company’s established sales process. Salesforce provides a set of standard drop-down list values common to solution selling, but your system administrator can modify these values.
  • Type: Use this drop-down list to differentiate the types of opportunities that you want to track. Most customers use the Type drop-down list to measure new versus existing business and products versus services, but your system administrator can modify it to measure other important or more specific deal types, such as add-ons, upsells, work orders, and so on.
If you add many fields, you might make the opportunity record harder to use, which then puts user adoption of Salesforce at risk. At the same time, you’ll have greater success with opportunities when you can easily capture what you want to track.

SFDC Functionality- Cloud Shedular

Cloud Scheduler allows you to request meetings with your customers, and have your customers select when they can meet before you confirm the meeting. When you use Cloud Scheduler to request a meeting, Sales force creates a unique Web page for your meeting that displays the proposed meeting times. When invitees visit the page, they select the times that work for them, and send you a reply. Sales force tracks all the responses so you can pick the best time to meet when you confirm the meeting. 

Implementation Tips:

• Cloud Scheduler isn't supported using Microsoft ® Internet Explorer version 6.0. 
• For users to request meetings using Cloud Scheduler, administrators must: 
1. Enable the new user interface theme. 
2. Add the New Meeting Request button to the Open Activities related list for contacts, 
leads and person accounts. The “Setting Up Cloud Scheduler” section below describes 
how to enable the new user interface and add the New Meeting Request button.
Best Practices Before you request a meeting, note the following: 
• You must have at least read access to the contacts, leads and person accounts that you request a meeting with. 
• Each invitee must have an email address specified in their record so Salesforce.com can send them a meeting request. 
• You can invite up to 50 people to a meeting. 
• We recommend you install Connect for Outlook or Connect for Lotus Notes so you can sync your     calendar events between Salesforce.com and Outlook or Lotus Notes. 
When proposing meeting times, it's helpful to have your Salesforce.com calendar up-to-date 
so you can see your free and busy times. 

Setting Up Cloud Scheduler:

To let your users request meetings with customers:
1. Enable the new user interface theme: 
a. Click Setup ➤ Customize ➤ User Interface
b. Select Enable New User Interface Theme.
c. Click Save. 
2. Add the New Meeting Request button to the Open Activities related list for contacts, leads, and person accounts: 
a. Click Setup ➤ Customize. 
b. Select either Contacts or Leads (whichever object you want your users to request a meeting with). If you have person accounts enabled and want users to request meetings with them, add the New Meeting Request button and the Email field to the page layout, which is located at 
Setup ➤ Customize ➤ Accounts ➤ Person Accounts ➤ Page Layouts. 
c. Click Page Layouts. 
d. Click Edit next to the page layout. 
e. Click Related Lists in the upper left corner. 
f. Double-click the Open Activities related list. You can also click the wrench icon ( ). 
g. Expand the Buttons section, and select New Meeting Request. 
h. Click OK. 
i. Click Save. 
3. Make sure users have the “Send Email” and “Edit Events” user permissions (these permissions are automatically selected in most standard profiles).
For more information, see “Viewing Profile Lists” in the Salesforce.com online help. If users don't have this permission, they:
• Won't see the New Meeting Request button on the Open Activities related list 
• Can't edit, reschedule, or cancel requested meetings 
4. (Optional) Add your company logo to the meeting requests sent to invitees: 
a. Upload your logo to the Documents tab, and make it externally available. 
Note the following guidelines: 
• The image must be in GIF, JPEG, or PNG format and be less than 20 KB. 
• For best results, use an image that is no more than 130 pixels wide by 100 pixels high at 72 pixels per inch. Images that are larger than these dimensions may not display correctly in some email clients due to automatic resizing. 
• If your custom logo is in the Shared Documents folder on the Documents tab, other users can replace it and indirectly change the logo that appears in meeting invitations. 
We recommend uploading the logo to your personal folder on the Documents tab so only you can replace it.
 b. Click Setup ➤ Customize ➤ Activities ➤ Activity Settings. 
c. Select Show Custom Logo in Meeting Requests. 
d. Select your logo, and click Submit. 
5. (Optional) Add the Requested Meetings sub tab to the Calendar section of the Home tab so that users can see a list of the meetings they've requested but not confirmed: 
a. Click Setup ➤ Customize ➤ Activities ➤ Activity Settings. 
b. Select Show Requested Meetings in the Calendar Section on the Home Tab. 
c. Click Submit. 
6. (Optional) Enable your Partner users to request meetings: 
a. Update your custom Partner User profiles: 
i. Include the “Send Email” and “Edit Events” user permissions. 
ii. Verify that the tab visibility for the Contacts and Leads tabs is Default On. 
b. At the bottom of the partner portal detail page, click Edit Profiles and activate the custom Partner User profile. 
c. Assign the custom Partner User profile to your Partner users: 
i. To create a new partner portal user, click Work with Portal and choose Enable Partner Portal Login on the contact detail page. 
ii. To update an existing user, click Work with Portal and choose View Partner User on the contact detail page. You can then edit the user and assign the custom profile. 
iii. Click Save.